Thursday, July 22, 2010

July 21st, 2010 - My First All Grain Brew Day - Pale Ale

I had constructed all of the equipment and found a simple Pale Ale recipe so I was ready to start. I started looking at the numbers and I wasn't convinced that there was enough. My primary fermenter is 30L and my secondary is 23L. All of the AG recipes online are for a 5.5 gallon batch, but 30L is 6.5gallons .... I usually fill the primary as high as I can and of course, a lot is left behind (trub and some wort) when I rack to the secondary. I wanted to make sure I didn't come up short so I modified the recipe. I started a spreadsheet and converted all the ingredients from a 5.5gallon batch to a 6.5gallon batch. I also substituted where I had to, and converted imperial units to metric. Here is the original recipe with my changes marked:

Source - Haus Pale Ale

RECIPE

5.5 gallon batch (conversion to 6.5gallon and other changes in red)
Grain Bill:
8 lbs - 2-Row Pale Malt (4.3kg 2-Row Pale Malt)
2 lbs - Vienna Malt (1.1kg Munich Malt)
0.5lbs - Crystal 10L Malt (0.27kg Carastan15L)

Hop Schedule:
1.0 oz Cascade (60min) 34g
0.5 oz Cascade (30min) 17g
0.25 oz ascade (15min) 9g
0.25 oz Cascade (5min) 9g


1 Whirlfloc Tablet (15min)

Nottingham Yeast

Ferment in Primary for 10 days @ 68F (7 days Primary, 7 days Secondary)


5.67kg of grains (12.5 pounds)

Hops, Yeast, and Whirfloc

The grains needed to be mashed at 152F for 60 minutes, and I had to account for heat loss. I anticipated 10-12 degrees loss to the cooler walls and another 11 degrees to the grains, therefore, my strike water had to be heated to 175F. Using 1.35quarts of water per pound of grain, I used 15.5L of mash water. The water was heated to 175F and poured into the cooler. I closed the lid and the temperature rapidly dropped. In order to make sure I hit my mash temperature of 152F, I would have to Dough-In at 163F (anticipating 11degree loss to grains. The grains were added and I mixed well until the temp hit 152F - I closed the lid and covered the cooler with an electric blanket and covered that with a fleece blanket just to be sure.

Heating 15.5L of strike water to 175F

Dough-In at 163F - I can't believe how amazing this smelled

Lid closed and covered up with electric blanket and Maple Leafs fleece. (I'm praying for playoffs this year)

Electric Blanket set to high

After 60 minutes, I opened the lid of the MLT and was very pleased to see that I was able to hold steady at 152F for the full hour. The mash was left for another 8 minutes while the mashout water was continuing to be heated. I calculated Sparge water at 1.33quarts per pound which worked out to 14.5L, this left me with 5.5L of water for the mash out. The total water used was 35.5L, this accounted for a volume of 6-7L to be lost to the grain and to the boil off. My calculations were correct because in the end I nailed the volume for the fermenter dead on! The 5.5L were added to the mash at 175F and stirred in, I let this sit for 5 minutes before vorlauf and collecting the first runnings. My understanding of the mash-out is to mainly bring up the temperature of the wort to allow it to flow easier out of the Mash / Lauter tun. Vorlauf is the process of clarifying the wort, I simply pour into a pitcher when the valve is first opened until the wort begins to run clear. This pitcher is then poured back into the MLT while the first runnings are being collected.

The mash held at 152F for the full hour

Vorlauf - drain the wort into a pitcher until it begins running clear

Vorlauf - returning the collected cloudy wort to the MLT (we wouldn't want to waste any sweet delicious wort)

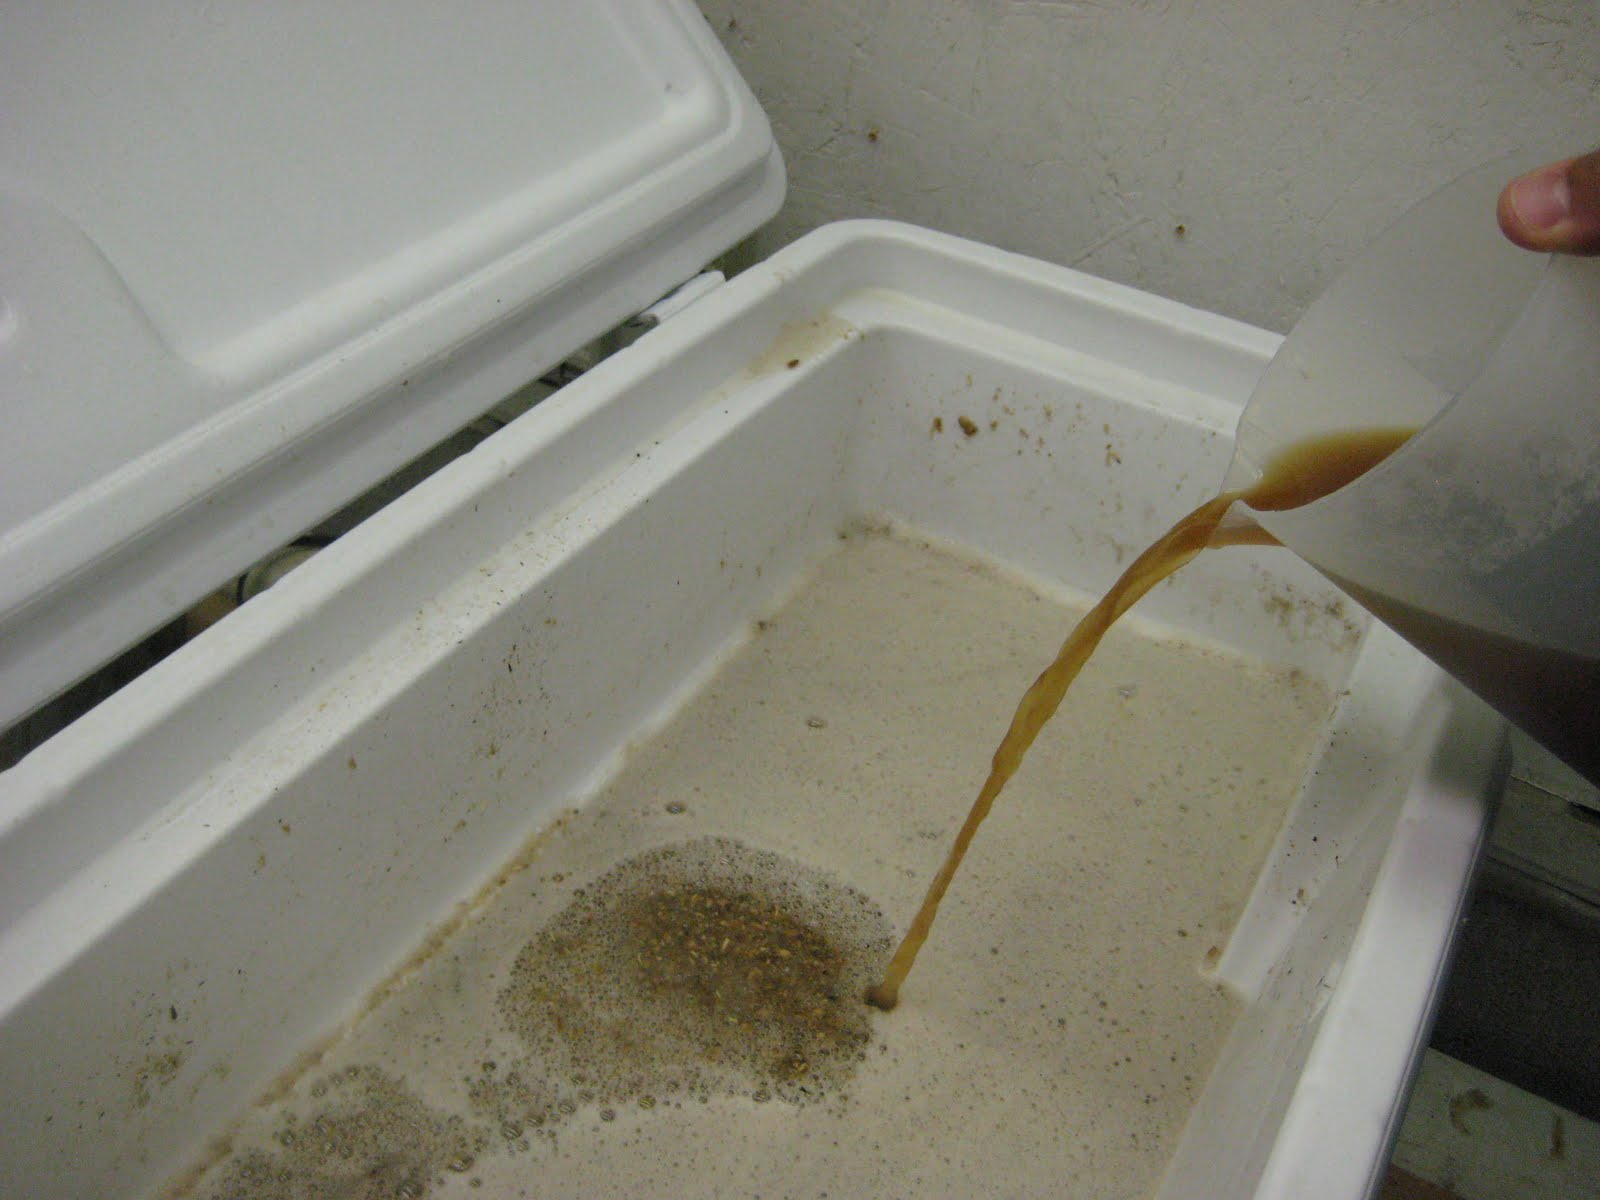
Collecting the first runnings

When the MLT was finished draining, the valve was closed and the 14.5L of 175F Sparge water was poured in, mixed well, and the lid was closed for 10 minutes. I then began vorlauf and collected the second runnings. The wort was boiled for 60 minutes and the hops were added per the schedule. With 15 minutes left in the boil, the wort chiller was dropped right into the boiling wort (this will sterilize the chiller) When the boil was complete, cold water was run through the chiller and the wort cooled from boiling to 80F in less than 10 minutes. I transfered it to the primary, pitched the yeast, and added a blow off tube. I took a gravity reading and came in at 1047, which is only 4 points below my target. I'm pretty happy about being that close on my first all grain brew!

Compacted grain bed after first runnings were collected.

Close up of the grain bed - mmmmmm.

Wort chiller dropped into the brewpot with 15 minutes left

Primary fermenter with a blow off rigged up.

Gravity reading of 1047!

Over all my first all grain brew day was a success even though I did have trouble with my propane burner. I had trouble heating the water as well as maintaining the boil. I fear the boil inconsistency will affect the hop utilization negatively. I started my brew day at around 7PM, and at about 1AM and many beers later, it was complete. i will have to investigate what the issue is with the propane burner before my next brew day, which hopefully wont take nearly as long.

Here's My Home-Ade wort Chiller

Well- I just finished my first All Grain Brew and it's 1AM and I can't find the camera? (I hope I didn't boil it??) So for now, here is some pictures of my home-ade wort chiller which worked very well tonight. Brew day post coming soon.

The wort chiller in the brew pot.

The wort chiller out of the brew pot - cold water gets pumped in and the discharge is quite hot - this cooled the wort from 210F to 80F in 10 minutes!

Sunday, July 18, 2010

Construction of a Mash and Lauter Tun

I have only been brewing beer for a few months, but i'm ready to jump into All-Grain brewing. I was afraid to make the jump mainly because I thought it would be a large investment. I did some research and realized there was nothing to be afraid of, I already had the perfect cooler to convert to the Mash and Lauter Tun, so I only needed around 30 dollars worth of material to make the conversion. I would also need to find a larger brewpot and a burner that could bring 6+ gallons to a boil easily... luckily Walmart had a good deal on a Outdoor Lobster Boil kit.

Coleman Extreme cooler which I received as a gift years ago. I never really used it because its odd shape inside made it difficult to fill properly with beer.

Outdoor Lobster boil kit which will be my new brewpot.

Why do I need a Mash / Lauter Tun? - Up until this point I have been brewing partial mashes which rely on a malt extract, which is a product produced strictly for home brewers. Basically someone has already mashed the grains for you and sells it in a concentrated syrup. Partial Mash brews rely on the extract for over 90% of the fermentable sugars and then during my brew a small amount of grains are steeped to add color and mouth feel. The Mash and Lauter Tun will allow me to brew an All-Grain Beer without using any extracts. This will produce a much higher quality beer and will allow me more freedom with the recipes. It will also eliminate any "homebrew twang" off taste that may have been present as a result of the manufactured extract syrups. To be able to Mash I need a vessel which is large enough to hold over 10lbs of grain with water at a steady temperature for about an hour..... a cooler is perfect for the home brewer. Mashing allows the enzymes in the Malt to break down the starch in the grain to sugar. Lautering is the process of separating the liquid wort from the grains. I have built a manifold in the bottom of the cooler that will allow me to do just that ..... hence the Mash and Lauter Tun will be a single vessel.

Why do I need a larger Brewpot? - Previously I was boiling half the batch and topping up the fermenter with cold water to get the full batch size. I was able to do this because I was using a concentrated extract. When Mashing, I will have to be sure to use the proper amount of water and will be boiling a full 5 gallon batch. 

Before I get too far, most of the info for this conversion came from Home Brew Talk Forums and specifically http://www.homebrewtalk.com/wiki/index.php/Converting_a_cooler_to_a_mash_tun

The first step was to remove the spigot from the cooler and construct a water tight passage that would have a ball valve on the outside to control flow speed and a coupler on the inside that would be able to receive the manifold. I used a 1" diameter, 2" long brass pipe nipple, on the inside I reused the rubber gasket from the original spigot and threaded on a 1" coupler. On the outside I threaded on the ball valve and used washers to space it and keep it snug.
1" coupler threaded to the pipe nipple - here you can see the re-used rubber gasket from the original spigot

ball valve on the exterior spaced with 4 washers.

Next I built the manifold. I cut the copper pipe to the lengths I required and simply pieced it together using tees and 90 degree bends. Everything fits snug together so no welding was required which will make this easy to disassemble for cleaning and maintenance. I used two 45's to line up with the exit to the valve as instructed in the homebrew wiki link above, however the manifold would not sit flat on the bottom. I simply offset it slightly to allow the manifold to sit flat on the bottom. A series of slits were cut into the bottom of the manifold which when completed will allow the wort to drain from the cooler and leave the grains behind. There was really no science to the pattern of the manifold or the spacing of the slits, I just hope it does what I need it to do.
The copper manifold constructed and in place

The bottom of the manifold reveals the slits

closer view

I then heated up some water to 160F using the new brew pot to test the MLT for leaks and everything was perfect, not a drop.


I now am excited to choose a simple recipe for my first All-Grain brew day, and find some time to do it. When I was brewing extracts and only doing half boils, I was able to cool the hot wort by topping it up with cold water. now that I will be doing a full boil, I will need a method to cool the wort quickly to an appropriate temperature for pitching the yeast. Until I have the time to build a wort chiller, I will have to use a large bucket of ice water.

Thanks for reading - All Grain Brew Day post hopefully coming soon.

Monday, July 12, 2010

Brew Day July 5th, 2010 - Light Ale

Before I start this post I have to give a huge thank you to Dan and Leanne for the amazing hand made Moonstone Brewery sign. This will be mounted over my garage door when I move my operations out there. Eventually, I hope it will be hung proudly somewhere in our real brewery. Honestly  .... this was a huge surprise. Thank You!

Receiving the sign in Pymatuning State Park PA

Displayed proudly in front of my beer fridge.

It's summertime, so I am trying something light, this beer is half rice and and half malt for a lighter body. Also, the amount of sugars is reduced because I will be using an additive that will ferment 100% of the sugars producing a very light, dry, crisp beer. This Beer is also a full extract beer, meaning I did not steep any grains, this is the first time I did not use grains which is interesting on the timing because I am taking advantage of my holidays this week to make the jump to all-grain brewing. Stay tuned for updates of my Mash / Lauter tun construction.... eventually the Brewery will be completely moved completely to the garage.

Here is the recipe, the Amalyse enzyme is the additive that will ferment this beer right down to a 1.000 gravity.

1.5 Litres Pale Extract = 3.3lbs
1 lb of dry Rice Syrup = 1.2 lbs

Hops
-----------------------------------------------------------------------------
1.00 oz. Hallertauer - 45min
0.25 oz. Hallertauer -
5min
0.25 oz. Hallertauer – 0min


Extras
--------------------------------------------------------------------------
1.00 Tsp Amylase Enzyme Other 14 Days(fermenter) 


Yeast
-----
Nottingham

Notes
-----
Add Amalyse when racking to secondary

Ingredients

Boiled 1pound of dry rice extract (the pale malt extract was added at 20 min remaining in the boil)

Light Ale in the fermenter

Blow-off tube to deal with Nottingham Yeast vigorous fermentation (which did not happen)

Original Gravity of 1034 - I was shooting for 1030.

Post here and let me know if I should add lime to this beer or not? .......

Monday, July 5, 2010

Updates - Finished Brews

I apologize for the lack of posts ... the real reason is that I brewed so much, I ran out of bottles and I couldn't drink it fast enough to free up some bottles.... I know it's hard to believe, but it's true. Today I am brewing Moonstone Light, which will be a very dry, light bodied beer, I'm also toying with the option of adding lime to half of the batch.

For now, all I can give you are some pictures of the current brews that are being served here at the brewery. (my basement)

Orange Peel Ale - This beer is a great Pale Ale, however, I don't taste the Orange and coriander coming through as strong as I would like.

Apfelwein - what can I say? Simply delicious, easy to brew, and it'll fuck you up! look at that thing bubbling,

Strawberry Blonde - I have only tried one so far and it is interesting..... I need a second, third, and fourth opinion. you can definitely taste the Strawberries.